
Better Practice
In this area of the site you will find some interesting ideas to help you create better music and get more pleasure from your practice and performance. We have articles and videos explaining the technicalities related to playing and a link to software which will help you make your living room sound more like a performance space and help you to hear more clearly what you are playing.
A Bigger Sound...
Fiedler Audio AD480
One of the real chores about practice at home is that unless you live in a palace, church, theatre or giant cave…. your beautiful instruments always sound horrible! The dry acoustic of the average living room -full of carpets, curtains and soft furnishings- means that it is not far short of being an anechoic chamber and as a result you will struggle to hear clearly and will force your tone in a vain attempt to cope. Playing in a hall or church is so much nicer… the building sings along with you and the reflected sound means that you can clearly hear what you are doing and as a result…. it is so much easier to sound great and you play so much better!
The Fiedler Audio AD480 is a piece of software which will enable you to virtually turn your practice space into a much larger room. It is actually a fully specified reverb unit aimed at the music production industry, but it will run on any iOS device (iPhone or iPad).
,N.B. Sadly it appears nobody makes an Android equivalent at this moment in time…. but we will keep our ears and eyes open for those who are not Apple users.
However, the good news is that it will run on older Apple devices just as effectively as an expensive new one…. we have run it on a 9 year old iPad 2 and it works fine!
The device is actually very complex with lots of adjustable settings, which could be very daunting, but if you buy either the intermediate version ($3.99) or the premium version ($13.99) it is possible to control exactly what it does and even to store the settings as presets. There is also a free version, but it cannot be controlled… so you have to use the provided presets. This might be fine in a recording studio, but will cause chaos by howling at you if you try and use it in a live situation… so don’t even be tempted! IT WON’T WORK!
We have a video demonstrating and explaining exactly how to setup and use the AD480 either for private practice… or to get it to work seamlessly with all our Consorts recordings, so that as you play along it sounds like you really are a part of the ensemble. There are also screen shots, written descriptions and links. Finally., we also have a settings file which you could upload into your AD480 if you buy the premium version.
If you want to practice your scales and exercises, or perhaps get that tricky bit right,.. the AD480 can help create a more lively environment for you to play in. We use it all the time to turn a very dry room into a vibrant ambient performing space. Alternatively, there is always the bathroom… provided some other member of the family has not already bagged it for some singing practice or something far worse!
App store link will only work properly from an iOS device, as it is where software for these devices is held.
Setting up AD480 manually
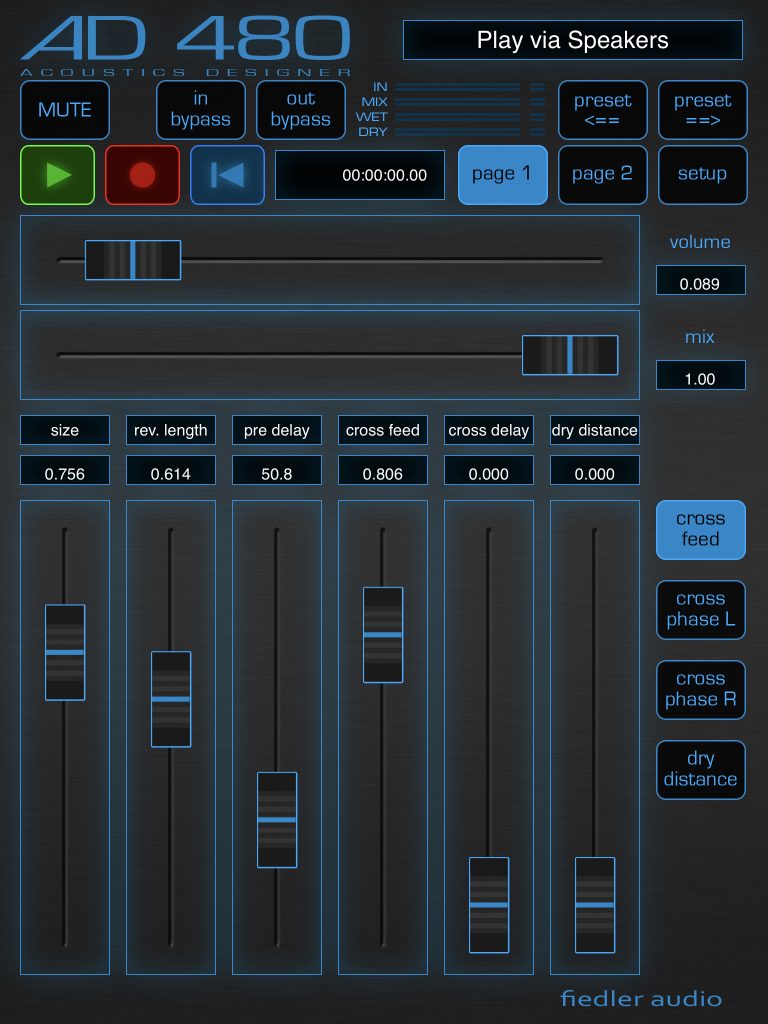
Once you open the software. Select the box at the top right which labels which preset is selected, to see the list of 100 presets supplied by the manufacturer. We quite like No66 which is a large hall.
Page 1
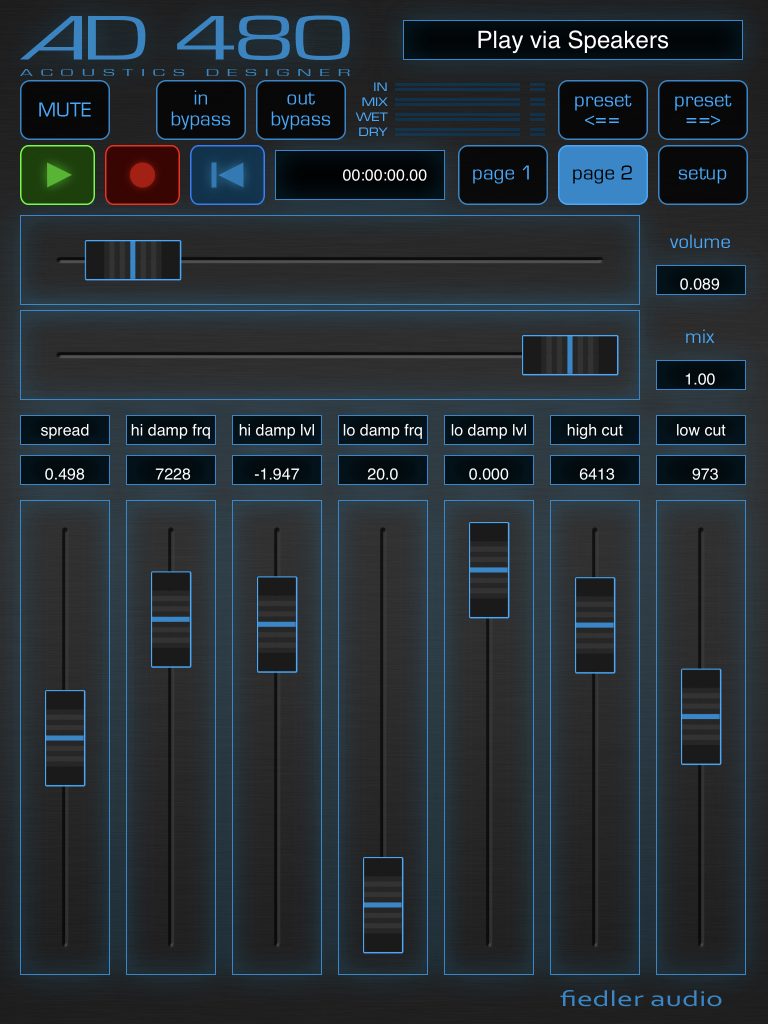
For loudspeakers, the horizontal volume slider must be set very low… ours is set to about 0.1-0.2…. you may need a little more or less depending on your instrument and the piece you are playing on Consorts. The mix slider immediately below it, needs to be set to max level (1.00). The vertical sliders are all related to the preset you choose…. you can adjust them as you wish, but the presets are actually very good without further adjustment.
If you are using headphones, you will want almost the opposite…. higher volume and very low mix… we use near 100% volume and about 0.1 for the mix. This allows you to hear your own instrument at roughly the same volume as the recording and only adds about 10% of reverb….. any more and it will sound like a very large cave!
Page 2
If you select the page 2 button it will take you to another set of faders. There is one very important one… LOW CUT (far right) – Set this to about 900Hz. This will filter out all the lower frequencies and effectively help stop it howling (feedback). Like the first page… the other faders are set by the preset and can be adjusted, but will probably work best if left as they are!
If you choose a different preset , then you may need to check the volume, mix and low-cut faders as they will be reset by the change. Set them back as already explained above.
Setup Page
On the setup page there a couple of important items….
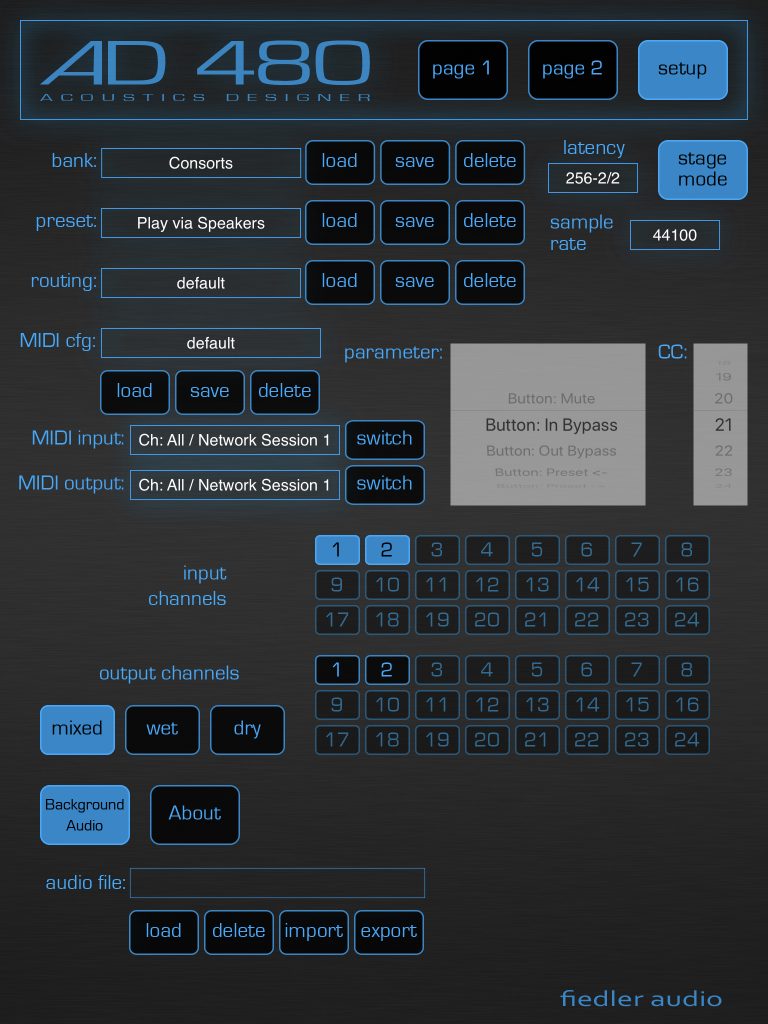
Firstly, near there botton of the page, select the background audio button. This allows AD480 to work even when you are using the web browser to choose and play Consorts tracks! If you do not select it, it will turn off as soon as you switch to your web browser!
Just above are three buttons labelled mix, wet, dry. Select the mix button and make sure the output channel 1 and 2 are selected. You should not need to do anything here, it should already be set!
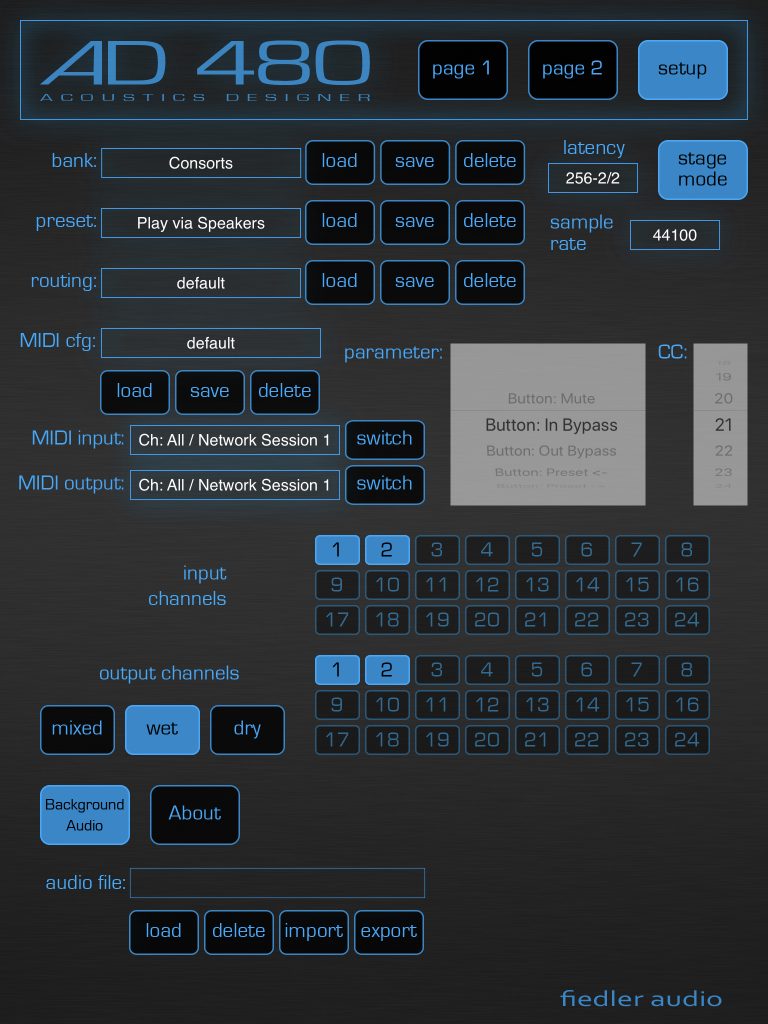
Next check that when you select the wet and dry options, no audio channels are selected in the adjacent routing panel.
II you have the premium version, it will be able to load settings from file and store them for later recall. At the top of this page, you will use the load buttons for banks to create and load your settings files…. If you are tech savvy, this will not be an issue… but it can be fiddly and a bit confusing for those who are not quite so comfortable with such things!
If you are a premium purchaser, then you will be able to use the settings file we have created to do most of this work for you…. and you should then get the same results we get! (See below for instructions)
For those who buy the $13.99 premium version… the button above links to a zip file with a set of files which you can copy to your iOS device via the sync settings in Apple Music (iTunes). It contains 2 presets…. one for speakers and one for headphones.
Download the zip file on your PC where you normally sync the device… and double click it to extract the files. Plug in your iOS device and open Apple Music/iTunes. Select the device in the left hand list and then select ‘Sync Settings’ which will open in a new window…. and then ‘Files’ from the headings.
AD480 will probably be the first folder in the folder list… Drop the contents of the zip file into this folder…. it will sync all the default settings files in that folder and clone your AD480 to match our one.
The only control not affected by the settings is the volume control, which you will use to set the balance between the Consorts playback and the sound of your own instrument. Generally, this will be near max for headphones and low for speakers, but is always different from user to user and system to system.
Recording at Home
In recent times, many people have been experimenting with home recording. The digital revolution now means we can all work to exacting professional standards if we want to… only using our home IT kit and some relatively cheap add ons. If you do record at home, you have a choice of working with audio and video, or audio only… as we at Consorts do. As this is an area of expertise we have, it seems only reasonable to share our thoughts on the subject with you.
So why would you choose audio only…?
Audio is much simpler to do and takes less time, space and energy. A good quality microphone, mic stand and an audio interface for your computer might cost you as little as £100. You may even find that the software you need is bundled with the interface, or is already on your machine. You can place a microphone anywhere you like without having to worry about it being in shot, or getting in the way of a camera. You can also edit the content much more easily because continuity is minimal in the audio situation, provided you are working in a quiet place with no obvious background noises. It means that if you fluff a note or there is a difficult page turn, you can go back 4 bars, pick up the recording from there and then adjust the edit point in the 4 bars of overlap to find a perfect gap for the switch. It also means that if you have 4 bars rest in one part, you can stop, record the other parts and then pick up again later once you have the other parts in place….
Audio data files are also very small…. if you want to work with the highest quality content, it will still be about 1,000x smaller than HD pictures and nearly 9,000x smaller than 4K! In real terms, video has to be heavily compressed to make it manageable, but even with oppressively heavy compression, it will end up being 10 or 20 times larger!
Video is also much more labour intensive, you only need to look at the credit list for you favourite TV program or film to realise this… whereas radio or audio is always a tiny team (producer, studio manager/engineer and performer(s)) or a solo effort (‘self op’ DJ).


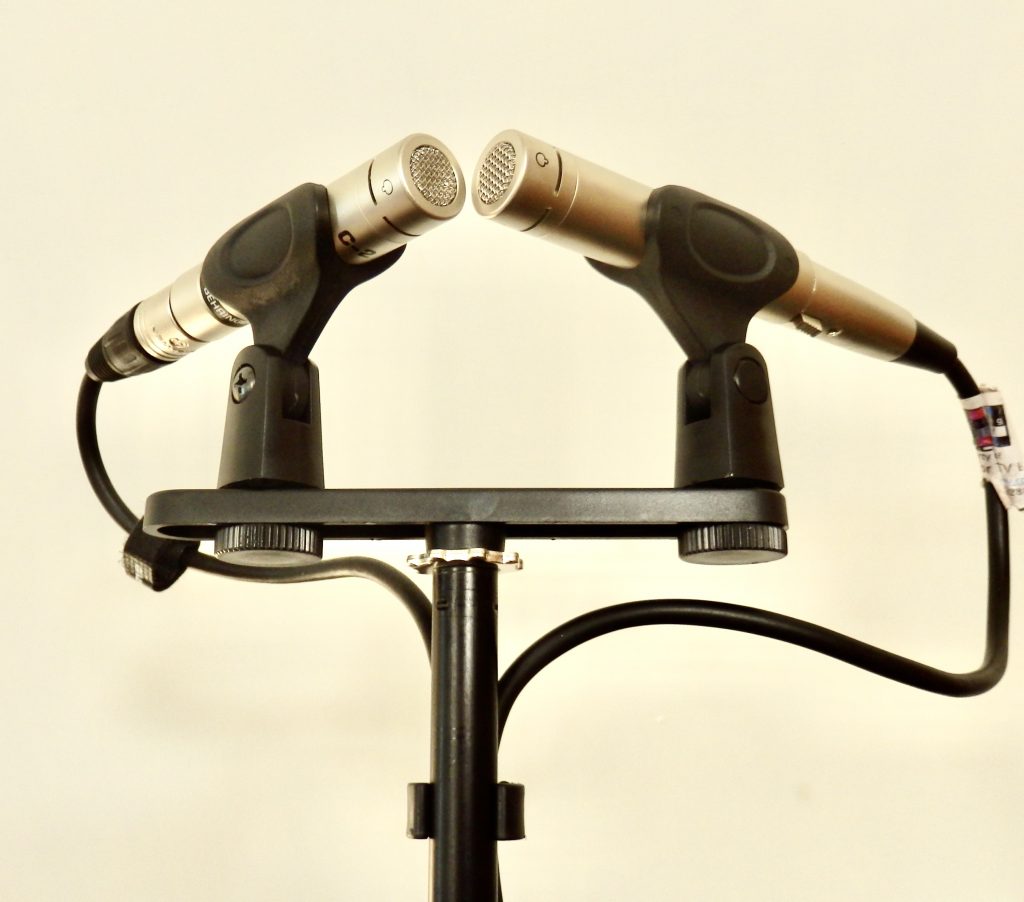
Behringer are a company that provide very good audio equipment at a modest price, however, do shop around as there are many others too. A stereo pair of cardioid microphones and a stereo USB sound interface…. Add a mic stand and a couple of mic cables and you have everything you need to record broadcast quality audio on a laptop.
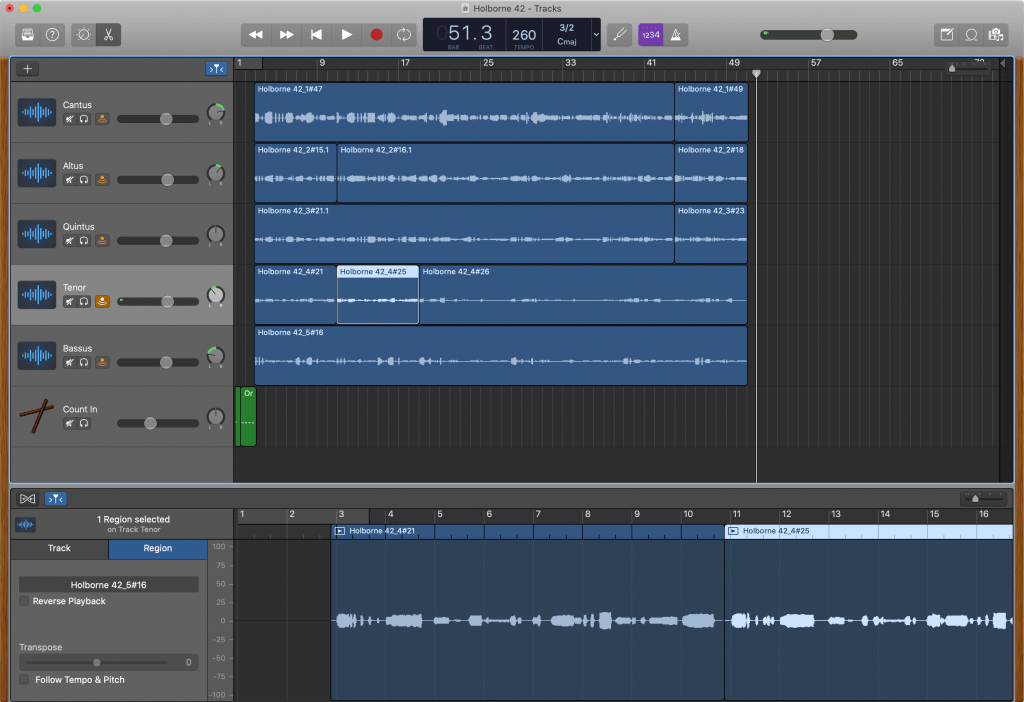
Garageband is a music recording and editing package which comes bundled with Mac OS or iOS. It is relatively easy to use and produces very high quality recordings. On the screen, you can see the highlighted retake in the tenor part, which was to improve the ornamentation of a first section repeat. You can also see similar pickups for the final repeat in the top 3 parts. As an alternative…. or If you are a Windows user, you will almost certainly get something similar bundled free with your audio interface box.
Why is video more complicated?
Pictures are our primary sense, so it is very important they are absolutely right. We may need to light the scene to make sure everything looks good, and to get different shots from different angles to help tell the story. Making sure colours match from one shot to another will also make a big difference. Because of our acute visual memory, we are very aware of minute differences in one shot compared to another, so unless we can shoot something in multi-camera (i.e. live) then continuity becomes a major issue.
Why do we need different shots?
It is possible to record 4 versions of the same piece (one for each part?) and post all to be watched simultaneously, but it is not really an enjoyable viewing experience with anything other than novelty value….. It is not how our eyes or brains work. To make good video, we need to mimic the human mind, because in real life, you do not look at the whole picture (wideshot) or even large parts of a scene all of the same time, your attention will be attracted by things you see and hear and it will focus your mind and with it, your vision… the pictures therefore need to do the same for the viewer who is not there to do it for themselves… This is the job of the editor or vision mixer… to choose the shots that best mimic how you would be viewing things had you been there personally and able to look where you wanted to. Choosing shots is about spoken cues, extraneous sound cues, facial cues, eye movements, movement cues… all of which might attract your attention and cause you to look elsewhere…
Recording Music
Recording music, should of course, be first and foremost about the music! Therefore not being able to place a microphone where it needs to be, or deciding that a smaller microphone is required so it is less obtrusive, even if it doesn’t work as well, means that you are already compromising the product. This alone makes audio only recording a compelling option…
As any radio enthusiast will tell you… Imagination is a wonderful thing! If you have audio only, then the listeners mind will create the pictures… you can record your sound and create any image in the mind of the listener, just by the quality and acoustic of the recording. The fact that the performer is actually in a very dry and rather boring looking recording studio (or the spare bedroom!) does not matter, the reverb and other effects added to the recording can conjure a beautiful concert venue or a church, a spaceship, a forest or… or… or…. Well the sky is (not even) the limit!
Click Tracks
If you do decide to record one part at a time, you will find that keeping the ensemble together is very difficult…. Without visual cues, it is nearly impossible to know when the piece will start or finish. If there are parts where only one instrument is playing, judging the next entry can be very difficult if that other part does not yet exist. A click track is just an electronic metronome recording to help guide you. We add 1 bar of click track to the front of every recording (or at least for the first entry) for completed items, but use a click track for the main recording effort. After the basic layout is in place, it is probably OK to listen to the other parts… If you have music which does not have any part which plays from beginning to end, even a click track can be tricky, so a stop start recording technique as outlined earlier becomes essential.
If you have pieces which require variation in speed… rallentando, rubato, or different time signatures, etc, then the click track can be very limiting. With some lateral thinking, it may well be possible to find software capable of helping with this. We use Musescore music writing software (a bit like Sibelius… but free!) to create the click track, complete with all time/speed changes. We then export this as a midi file and load into the recording software…. it doesn’t even need any notes – just one line of empty bars in the right order! This will then instruct the recording software when and how to click!
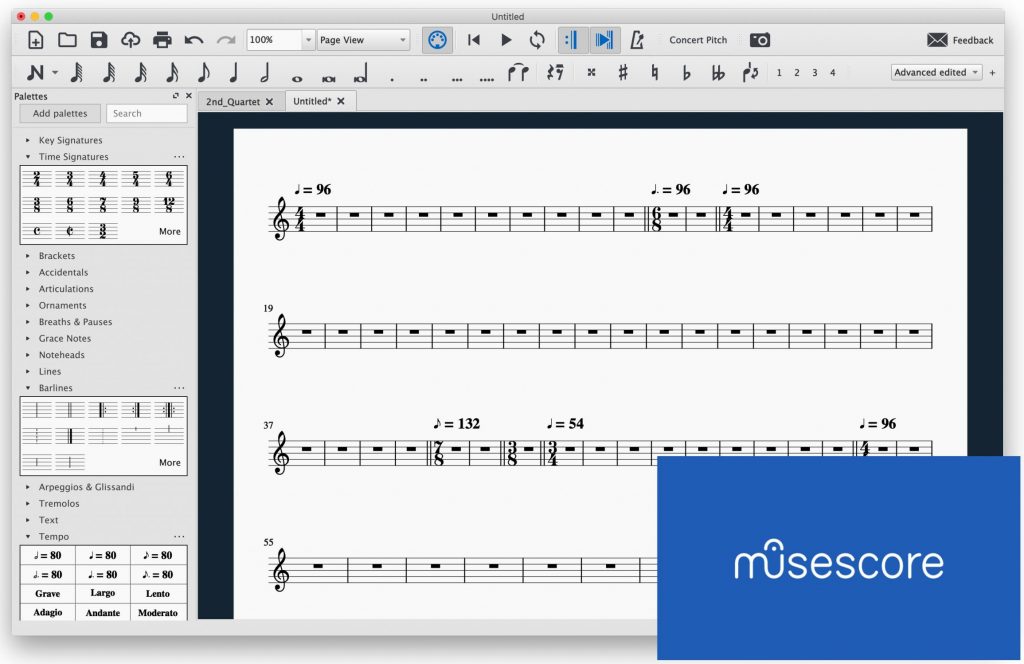
Musescore is a free and widely used score editor, which offers a broad range of desktop publishing functions for scores and parts of any size or scale. It is not quite as sophisticated as Sibelius…. but it is free to use! In the example above, you can see an empty page prepared with the right number of bars, time signatures and tempos…. If saved as a midi file, this can be opened in the recording software to regulate the clicks.
Sound for Pictures
The minute you add pictures, the sound is no longer stand alone…. and your eyes always take priority, so it needs to match and complement the pictures… If the sound does not match, the visual illusion will not work and the viewer/listener will be confused and distracted. If you can see something making a noise, you need to hear it…. equally, if you hear a noise, you probably need to see it!
If you listen to music on TV, the sound balance will be very different from the same music on radio or CD. If the pictures show a closeup of an oboe, then the sound mixer will need to push the oboe forward in the mix to match the pictures…. we do not notice it happening because our brains discount it getting louder because it matches the pictures. If you didn’t push it forward, we probably would notice…. because the pictures and sound would not correlate…
Equally, when you watch a movie, the soundtrack will include myriads of sound effects (as well as the dialogue and music), all added by the post production teams after the pictures have been edited. Often all the location sound is replaced at this point… even the dialogue (using a technique called ADR), so nothing from the original shoot remains. It is not unusual to find dozens of audio tracks in any single scene in order to create the perfect soundscape that matches the pictures…. and it is not really optional either, because not including all the detailed sound, just makes it all sound unfinished and breaks the illusion! Our minds are acutely aware of even minute sound changes… so you only notice the ticking of a clock…. when it stops! You could easily argue that visual illusions are 90% auditory!
Miming…
In the world of music, replacing sound afterwards or building everything around the pictures is difficult, so often you will find musicians ‘miming to track’. It is the technique used on most pop videos and also on a large number of so called ‘live’ TV shows. It means that the music can be recorded prior to the pictures, in the perfect acoustic and using the preferred microphones and placement. The performer can then film the pictures without needing to record the sound, just playing along with the recording during filming, knowing full well that the sound they make is not going to be used. This allows the camera to be placed anywhere it is required for the multiple takes that are recorded using different shot sizes and angles. Continuity is however, still critical and it is therefore important that the performer does still try their best to play the same way every time. This obviously becomes all the more important when the performers are dancing or acting as well as singing/playing!
If you want to include video in your recorded performance, then miming might be a very good option. If you wanted some help, you could even use one of our recordings as a starting point and record all the parts, one by one, and then put them altogether to replace our version… Once you have the audio, you can just play along to your recording and record 2 or three different shot sizes for each instrument (e.g. a closer shot including your face, a close up of fingers and a wider shot showing the whole instrument) and then put them all together in an editor choosing the best one for each phrase of the music. Most systems can run multiple recordings in sync for you to cut between, just like mixing pictures live which is by far the easiest way to do this sort of thing.
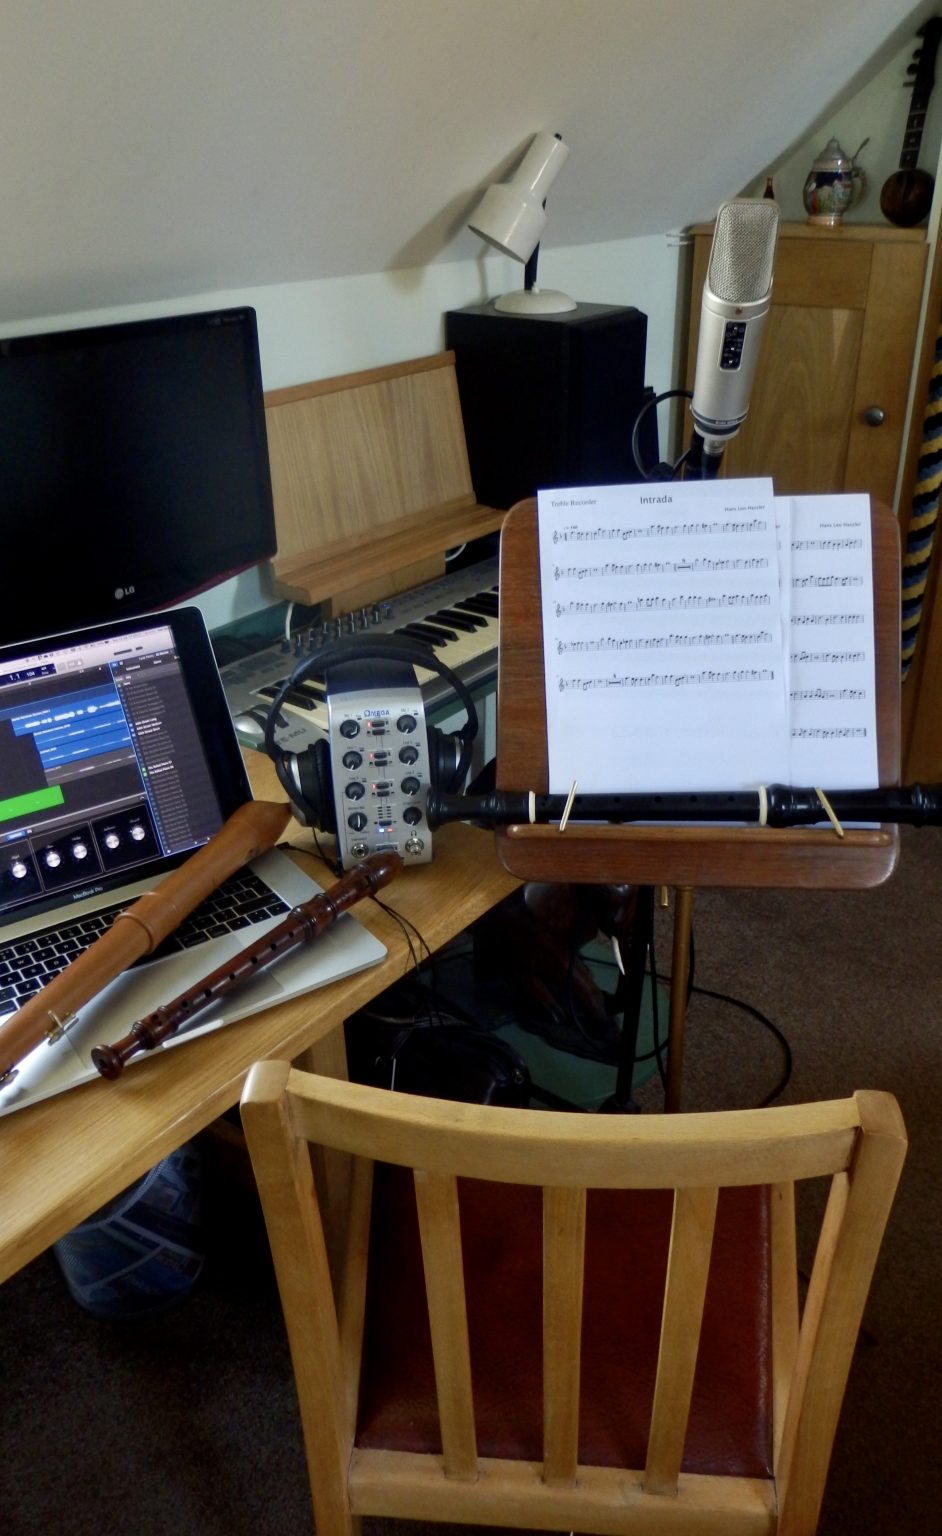
The consorts recording setup, shows a large Rode NT2A mic pointing over the top of the music stand. It is about 40cm away from the playing position and pointed towards the instrument. It will work well for all instruments which have a standard mouthpiece. For a knick instrument, it might need to be tilted further forward and moved up and over at bit further, so it remains parallel to the head, about 40cm away.
Working with Recorders
Recorders are relatively easy to record as they do not make excessively loud or quiet sounds. The sound they produce actually radiates out sideways from the instrument, mostly from the fipple and the first open hole. With the smaller instruments, a microphone placed about 40cm above the instrument at 90° to it, (so roughly pointing at the fipple) will do the trick. However, for the largest instruments like a Contra or Great Bass where a crook means the fipple is much higher and the holes further apart, a position about 40cm directly in front of the fipple is a better starting point. The microphone’s polar pattern is probably not very significant in this case, so you can use a cardiod, figure 8 or omnidirectional mic, although in the last case, it may be trickier if there is more background noise.
If you record in this way you will get a very good, relatively clean and dry recording. For multitrack work this is ideal, but it will need reverb to be added to make it palatable for any listener.
If you are recording a group of instruments in a live situation, there are two possible approaches…. use the above technique with one microphone per instrument and an audio mixer to combine all the channels into a stereo mix before adding reverb. Alternatively… and almost certainly a much better (and cheaper) option is to use a ‘stereo pair’ of microphones and borrow a building with a nice acoustic…. Listen to the sound and place the microphones where it sounds good, but a starting point would be centrally about 2m in front of the group with the microphones mounted adjacent with an angle of 90° between them. Cardioid or Figure 8 polar patterns will be required for this. It will provide a clean stereo recording, with figure 8’s giving the widest stereo sound, but possibly with poorer mono compatibility.
Monitoring
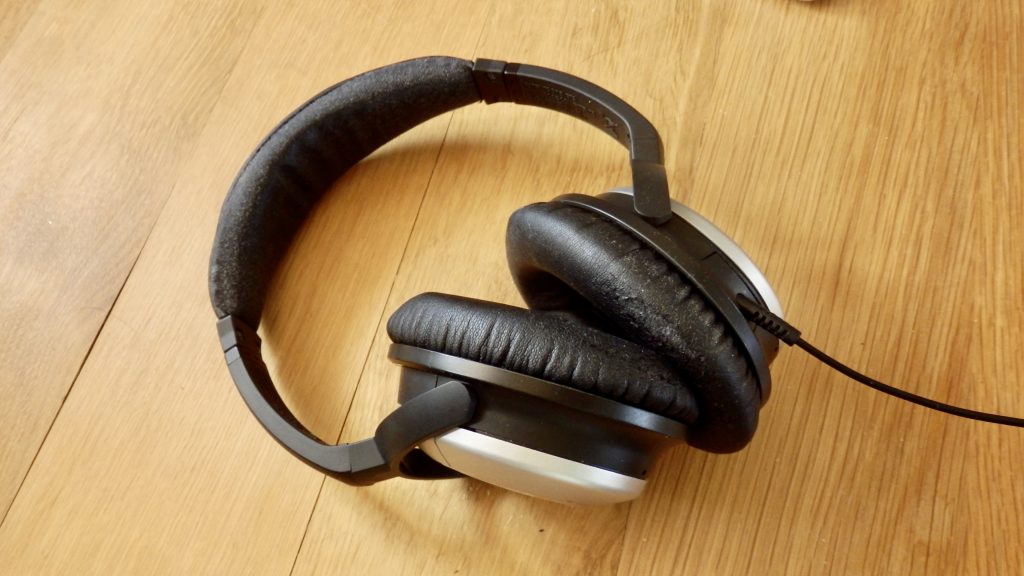
If you are working with a stereo pair in a live situation, it will be essential to make sure the instrumental balance sounds good… move the mics or individual players until you can hear them all clearly.
A professional engineer would probably use a mixture of both techniques…. using lots of mics and a large audio mixing console. Closer and more distant stereo pairs along with individual ‘spot’ mics will be continuously adjusted to get the perfect balance as the piece progresses. This takes time and effort to set up, lots of money and a good deal of experience to get an outstanding result! However, with just a single well placed stereo pair, you should still be able to manage at least 95% of that perfect quality!
Tuning In...
For many members of the public, the idea of recorder playing conjures horrors of little children playing dreadfully. Much of the problem for such beginners is their ability to play in tune. Playing in tune is actually something which is surprisingly difficult to do, especially when you want to get it spot on.… In this article we will peep under the lid of a very complex subject…
Natural Tuning
Tuning is a complete science in its own right and as you move around the world, you find many different systems and regimes. Traditionally, Western tuning has its roots in the world of physics and maths… In music we specify a pitch by a repeating pattern of letters, however a physicist will use frequency (the number of sound waves passing in each second). Pitch is regulated by maths… a whole octave will be double or half the frequency depending whether you go up or down and a perfect fifth will be 3 times the original frequency… (or 2x multiples thereof to go up/down an octave…). 5x the original will provide a major third and 7x something approximating to a minor 7th. This is called the harmonic series. So harmonics 1,2,4 and 8, etc., will all share the same note letter, as will 3, 6 and 12, etc.
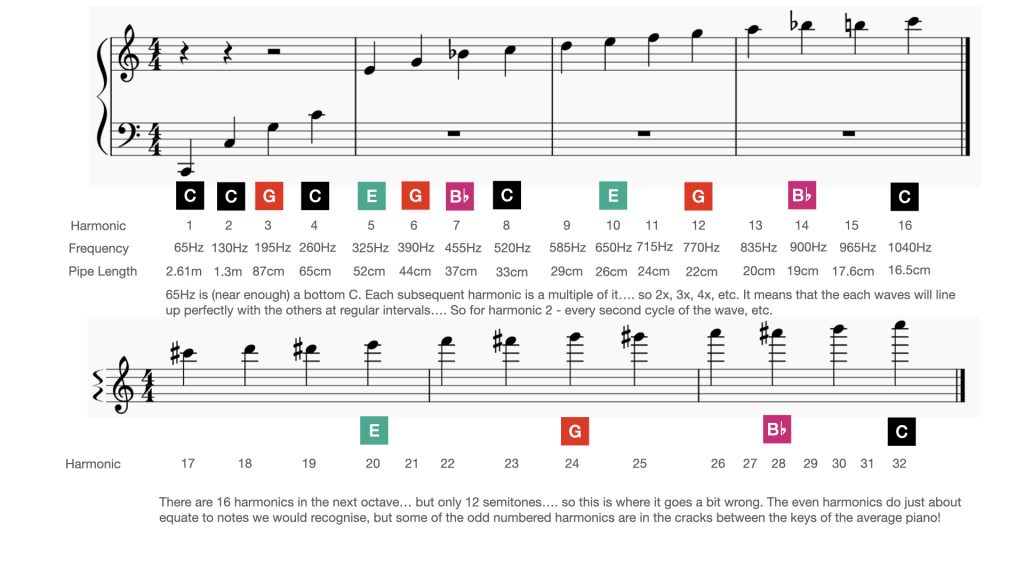
The Natural Harmonic Series in notes and frequencies… along with notional pipe lengths. The wavelengths will be double the pipe length. Note that in top octave shown, there are 17 harmonics, but only 13 semitones!
Other Options
The natural harmonic series only works if we stay in one key…. i.e starting from a specified tonic note. As you move to other keys, the series is different and returns different values for notes we would normally regard as the same…. This was a major problem for early musicians who wanted to modulate… If you multiply a tonic frequency by 3 you get the dominant (5th). Keep doing this and you will modulate around the whole circle of fifths and generate all 12 semitones and keys(C,G,D,A,E…) but actually, like the natural harmonic series this only partially works and it too generates progressively bigger errors the further you go from your starting note.
It is sometimes referred to as Pythagorian Tuning, although this is mainly when referring to a sequence of 6 fifths, to produce the 7 notes of the diatonic scale…. starting at the sub-dominant. i.e F-C-G-D-A-E-B to generate a C major scale.
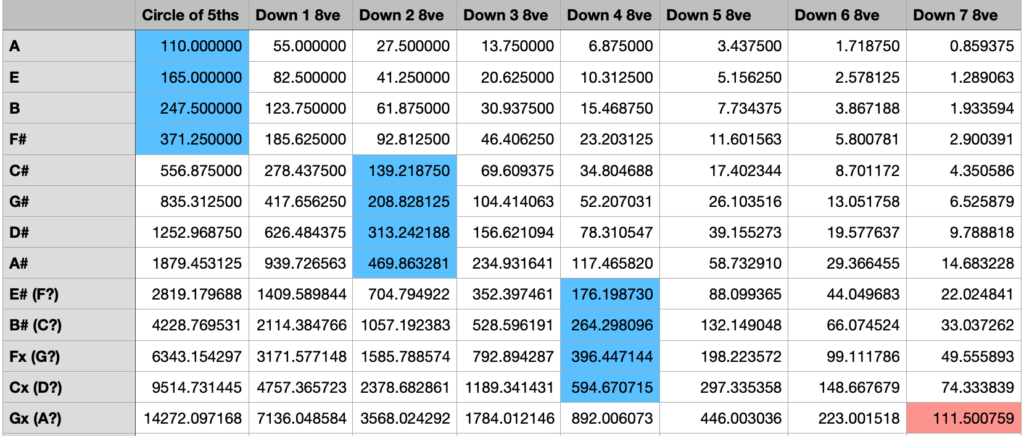
This table shows how all semitones can theoretically be generated from a circle of fifths…. A, E, B, F#, etc… Note that the last note in the circle is actually Gx not A… and at 223Hz, it is 3Hz sharper than the 220Hz expected (so it appears that Gx and A are not actually the same… as we might expect!)
The blue numbers show the frequencies of the harmonics after dropping octaves to get them all into a consecutive sequence.
This problem was partially solved by equal temperament (famously promoted by JS Bach in ‘the 48’). It uses the idea of a standard multiple between each note (a bit like an interest rate grows your money) so that things approximate to the correct value. It has been the basis of our musical system now for 250 years.
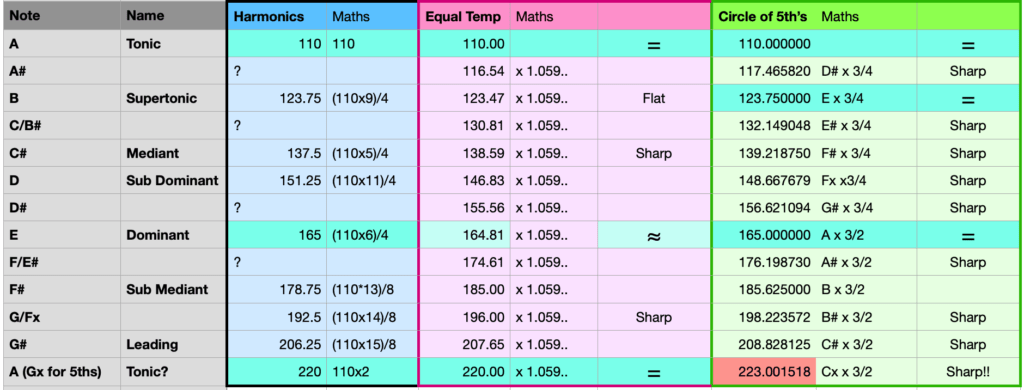
In the this table, we see a comparison of the natural harmonic, Equal Temperament and 5ths generated note systems.
Harmonics cannot generate 4 of the notes… we need 4 of the 8 odd numbered harmonics to provide the semitones…. harmonic 17 is probably OK-ish, but after that it gets somewhat tenuous!
Fifths sort of work, but generate a pattern which does not have an end… it too is clearly in the cracks between notes after the 11th note, which suggests it too was gently drifting away, long before that point!
Equal temperament is a compromise and uses 12√2 (an increase of 8.33% for those who don’t do difficult maths….) to get from one note to the next. All notes are proportionally spaced, however, in this system only the octaves are harmonically absolute, although the fifth is very nearly correct. All other notes are a bit sharp or flat compared to natural tuning.
If you are thinking about performance practice… any music which pre-dates the late baroque period should probably be played using a natural harmonic temperament. It means that for instruments that have fixed tuning…. e.g. a harpsichord… modulating away from C major will start to cause issues…. and minor keys will be a bigger problem! For a recorder, the problem is less critical as we can probably lip notes up and down by the appropriate amounts. provided we don’t go too far. In real life, we probably do not play solely within any one temperament… and a good player will be tuning by ear to get the best possible alignment of the sound waves…. which is the ultimate definition of ‘in tune’! However, when playing with fixed instruments in an ensemble, things would be much more problematic as they will not be able to adjust and get things right…. even if the other instruments can!
That being said… after 250 years of equal temperament, we have all got used to certain notes not aligning as they theoretically should and when we hear a correctly pitched natural major third, it now sounds dull and flat…. We are used to them being bright and a little sharper than they should really be!
Recorder Tuning
The recorder is actually a relatively simple instrument with only enough holes for our seven fingers and thumb, so getting all twelve semitones in the bottom octave (no harmonics at this point) requires fork fingerings (where we open different selections of holes that are not in sequence) which allow us to ‘spoof’ the effective pipe length.
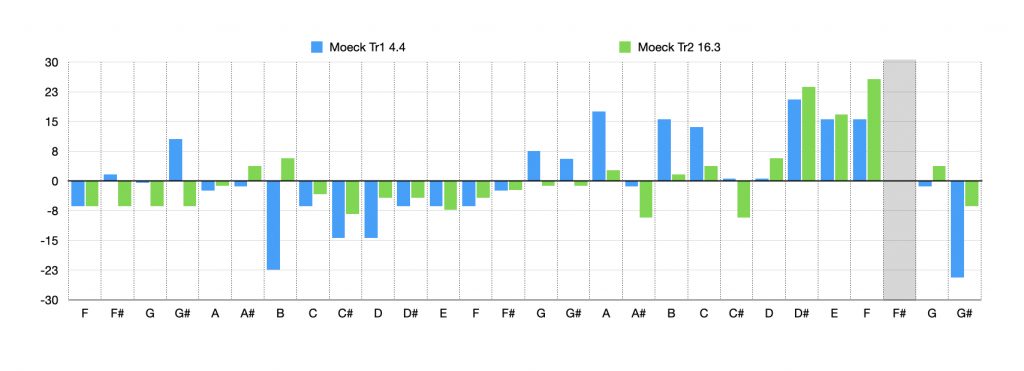
The graphs shows tuning average for each note in cents. Cents are hundredths of a semi tone. Above the centre line is sharp… below is flat. Treble 1 was 4.4 cents sharp overall and treble 2, 16.3 cents which was corrected with adjustment of the head joint. However, there were very few notes where the instruments matched and many did not even got close to each other. It is worth noting that even a gentle vibrato may cause a variation of +/- 5 cents, so will not therefore sound noticeably out of tune.

Above is a similar test for three different sized and manufactured instruments. You will note that these too all have very different tuning profiles.
A C major scale played slowly to test tuning. In this case, almost all notes fall within a few cents. Because the notes are closely related mathematically and aurally, it is much easier to adjust and pitch them correctly.
Group Playing
The minute you start playing with other instruments, the issues of tuning become highly significant. A few cents between one note and another when they are played individually at different times will probably not be noticeable. However, once you put two notes together, the effect will become much more obvious. It will also be compounded by the fact that one instrument might be 15 cents sharp and the harmony provided by the second instrument might be 20 cents flat…. The difference of 35 cents (1/3 of a semi tone) will almost certainly be excruciating!
Luckily, we can blow more or less and adjust tuning and many notes will be adjustable by +/- 20 cents…..Good job too! However, there will be notes (perhaps bottom ones or high ones which are less stable) where the flexibility is much less. Hopefully, it will allow a really good ensemble to get most notes spot on. However, many people have found a problem when recording…. because the first track has no reference point (like the tuning tests) and therefore may be somewhat wayward. When you come to play the second, third, fourth parts, things become increasingly rigid, because although you can flex your tuning, the other instruments will not…. and if you have a difficult note… you might be in trouble and possibly need to re-do the offending parts!
Bigger is best?
As instruments get bigger, the frequencies get lower and the notes get closer together. The result is that beats are much harder to create! If we assume we have +/-20 cents of adjustment for each note…. lets look at what that is in aural terms.
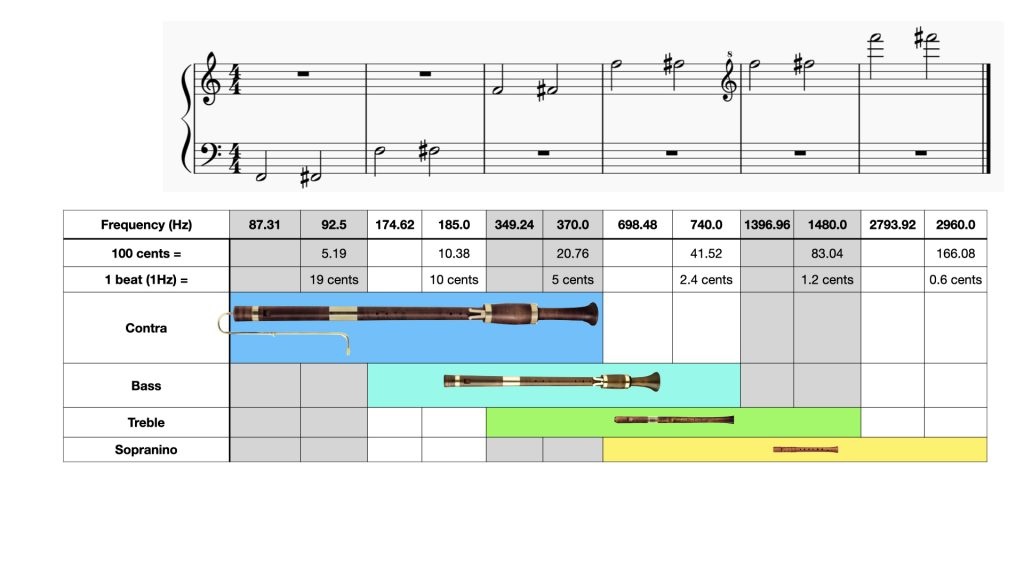
A table showing the bottom and top notes/frequencies of 4 different recorders. It then calculates how many cents are needed to create 1 beat per second. The important element is that the bottom notes of a contra are 40x less sensitive to tuning than the top notes of a Sopranino!
The diagram shows how the small instruments are much harder to control than the big instruments. It is possible to move the tuning of a big instrument a lot of cents and still not produce strong beats, whereas the small instruments only need to move a tiny amount to produce lots of beats. Couple that with the 6dB of gain per octave (see loudness on the sound page) and the small instruments are also up to 30dB louder!
This explains why many large recorders groups only allow the most experienced players to play the smaller instruments and unlike the bigger instruments… only generally only want 1 to a part. The fact of the matter is that the small instrument can quite happily match many larger instruments in terms of loudness and putting two of them together, creates a need for absolute precision in handling that would be akin to driving 2 cars down a bumpy road only a few centimetres apart!
In the clips below you will see a tuning meter measuring two test tones. In each clip you will hear an A followed by a note 10 cents higher. You should be able to perceive the smallest increase in pitch. You will then hear the two tones switch 3 times without a gap. Finally you will hear both together and this will create the usual beating we expect when two notes are not in tune.
The first clip is the bottom A on a contra (110Hz + 110.7Hz). The second is bottom A on a Treble two octaves higher (440Hz + 443Hz). The last is top A on a descant/Sopranino another 2 octaves higher (1760Hz + 1770Hz). N.B. If you are listening on your phone…. don’t expect the tiny speakers to cope with 110Hz….use headphones. Contra’s are big and so are their sound wavelengths!
Note that although the difference each time is the same (10 cents) the difference at the highest notes is easier to hear. Also note that the beating is much faster and suggestive of a bigger tuning error, even though the meter clearly shows it is the same. This is because the beating and our perception of tuning is related to frequency not cents!
How do I play in tune?
Rule 1 has to be listen carefully and be prepared to both adjust wind pressure when necessary… you may also need to change a fingering or two…. as an example, when playing the Coolsma Contrabass, the middle (2nd harmonic) A is very sharp, so I have to close the bottom F# key to help lower the pitch. In the tests shown above… even with this adjustment, it still came up about 8-10 cents sharp. When playing an E♭/B♭ on the Moeck instruments (treble/descant), I add the 5th finger to the fork fingering. However, with the Kung bass, the standard E♭ is very flat and requires the 4th finger to be removed and sometimes even part of the second as well!
The only way to work these things out is by ear or with a tuning meter. There are lots of meters available for your phone tablet or even sometime within a recording program on a laptop. Try downloading one and then play each note in turn (on each instrument in turn) and see if you can get it is tune…. If you need to use a large adjustment in wind pressure, look at fingering changes to make it easier. Remember, that if you need to play extra loud or quiet, you may need to find different fingerings anyway!
The trickiest bit is then remembering which instrument you are playing and which fingerings it needs! If you do decide to use a meter, make sure the recorder is warmed up before taking any measurements… or all your readings will gradually get sharper as the test progresses! The meter will be quite volatile because every little fluctuation in your breath will change the tuning. Expect it move around and not stay still. You should still however, be able to get an average ‘guesstimate’ as to your tuning.
Beware that the meter will be able to show variations which you will probably not be able to hear. Your brain will be doing a very good job of averaging out the tiny tuning variations because of vibrato and or variations in pressure as your lungs empty.
This meter is part of the Garageband recording software. It shows that it is measuring C+12cents with respect to A=440Hz.